Welcome

WELCOME


Welcome to the blog for our campervan build

This project began in May 2020 during the 'lockdown' in the UK due to COVID-19. We were supposed to be touring Europe in our existing camper conversion 'Movano The Van Hoe' but this obviously wasn't going to be possible... So after finishing a pretty ambitious Hot Tub Trailer build (see the blog here) we decided we needed another project to keep us occupied during however many weeks left of lockdown.

We put Movano The Van Hoe up for sale and bought a Renault Master which we will convert over the coming weeks/months.

We are fortunate in that Elliot has a fully equipped workshop with tools and space to work, and we're also fortunate in that this is Elliot's second camper conversion, so we're not totally winging it!

This is a blog of the full build and I make no apologies that it is very photo heavy. The primary purpose of the blog is to document this build both for our own records, and for anyone else who's interested.

We plan on touring around Scotland with our Trailer Hot Tub when travel restrictions are relaxed enough to allow this.

Disclaimer: This is NOT meant as a tutorial. Do not try this at home. Always seek professional expert advice.

Thursday, 28 May 2020

Stretchy carpet

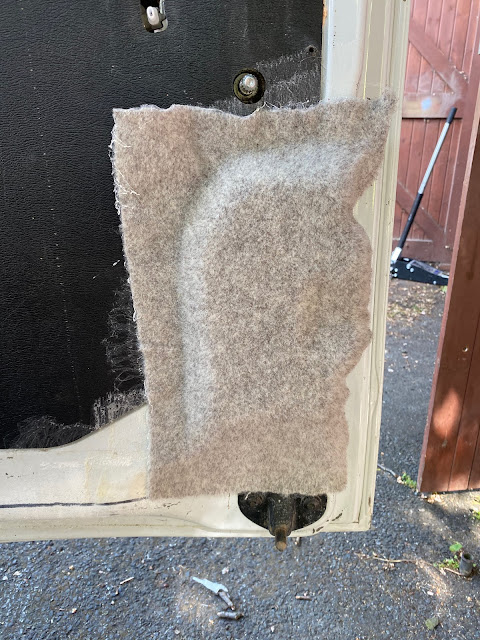
Today I was introduced to a new wondrous material; stretchy carpet. We're using this for the areas where we need to carpet over curvy awkward shapes such as the wheel arches and the curvy bits that will be seen behind the carpeted panels on the back doors. We're using "Easiliner" stretch van lining in the same colour as the Veltrim.

To use this stuff, spray adhesive is used, just like the normal Veltrim, this is sprayed on both surfaces and allowed to dry for 30 seconds.


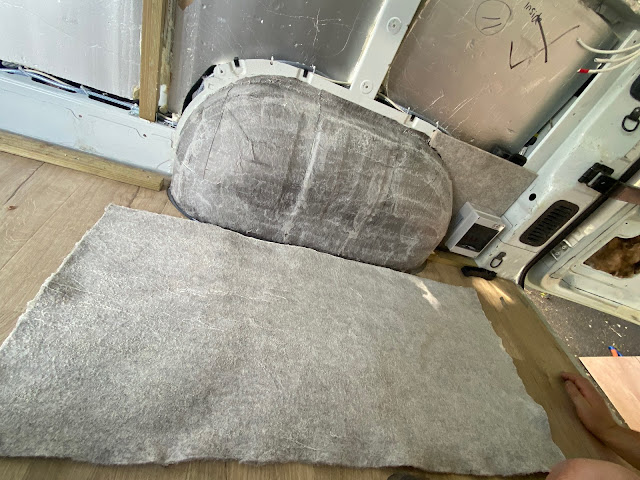


When it's being applied it's important to stretch the carpet over the surface, smoothing out any creases, and it will stretch and mould to the surface being covered.


The same process is repeated on the curvy bits of the back doors that will be seen behind our already-carpeted ply panels. 


Woooo the back doors are now actually finished! Elliot thinks we're 1/4 of the way through this build... I disagree, I think we have a loooooong way still to do.


Tuesday, 26 May 2020

Another back door, fluff and icing

Today we managed to carpet the ply for the other back door and started on securing the insulation.

We are using Knauf Eko Roll loft insulation in any parts of panels with moving parts (e.g. the bottom panel of the doors which houses the handle and locking mechanism). This stuff looks super fluffy but it's actually irritating to the skin and not a comfy place for a nap. It's easy to use, just rip apart to size and stuff in the holes... The parts using the Eko Roll are covered are vapour barriered using the same 4mm PET bubble insulation that's under the floor, which is foil taped into place. The reason we've created this vapour barrier is because as there's some chat that the Eko Roll insulation can absorb moisture. (The last van conversion used a similar loft insulation and hasn't encountered any moisture problems, but we want to err on the side of caution!)


Most of the insulation however is using 50mm thick Celotex insulation board which has already all been cut to size (see previous post!)

Next we got to play with some fun skooshy chemicals... The Celotex boards were affixed to the inside panels of the van with Soudall adhesive foam... Which is expensive but very, very, very sticky! 


It's applied around the edges of each insulation panel, looking very much like strawberry icing, and allowed five minutes to become 'stringy' and then it's pressed onto the panel of the van. 


The adhesive is allowed to dry for half an hour and then we've used Soudal expanding foam around the periphery to further insulate and secure the boards. This stuff is great fun! 


We used foil tape to 'control' the expanding foam and keep it where it's meant to be!


This will all be left overnight to dry, and we'll trim any excess expanding foam tomorrow. There's some panels we couldn't complete today as we need to be further along in the build (e.g. have cables finalised)

(The smily faced and ticks is our own little code to indicate which panels are completed in terms of insulation!)


Monday, 25 May 2020

BBQ, Battening and one Back Door

We both had to do some actual real-life work this morning, and had a wee cheeky barbecue outside the workshop before even starting on the van this afternoon.


We've added vertical battening to support the 'walls', using the same 38 x 25mm treated timber as the horizontal battens, secured to the van chassis with the use of 20mm angle brackets and the battening sandwiched together where needed using Sikaflex.

We plan on having 'cubby holes' within the walls, where we can store clothes and other stuff. This is to utilise the space otherwise lost in the curve of the van. (I'm sure this will make much more sense later on in the build!!)


We noticed two rivets on the locking mechanism of the back door were loose so these were drilled out and replaced. I dunno, I thought this was cool. It's very secure now!


Next was to template the first of the carpeted panels. We've started with the back doors as these can be finished first. To template, a piece of cardboard is stuck to the door and the margins of where we want the plywood panel to finish are marked out accurately using masking tape around the edge.


The cardboard template is then placed onto the piece of plywood and the shape cut out using a jigsaw.


The plywood is then tried for size, and trimmed further if need be.


Oh! Here's our HUGE roll of Veltrim


We've chosen to carpet the interior in Veltrim as its cozy and durable, and we've chosen their 'Stone' colour. 

The Veltrim is fixed to the plywood with contact adhesive, folded around the back, and the excess trimmed off using a Stanley utility knife. 


The finished panel was screwed to the chassis of the van with self drilling screws.  It's so nice to have one tiny part of the van looking 'finished'!


Saturday, 23 May 2020

Skylight and Roof Vent

So we want the van to have a feature 'panoramic' skylight, and figured we want it to be as big as possible, over the rear bed area so we can lie in bed and stargaze (how romantic... boke...)

Again there's been much research into materials and methods here. Choices boiled down to between a triple-glazed polycarbonate 'Mardome' roof dome or a custom made double-glazed glass unit. 

Various attributes made glass the better option for us; it allows the roof of the van to be as streamlined as possible (the polycarbonate units are way more bulky), it has better sound insulation (36 LiA compared to 62 LiA)*, and its thermal properties are more favourable (u-value of 1.0 W/m2 K compared to 1.8W/m2 K)**

*LiA = A-rated sound intensity level in db = how noisy stuff is, weighted to how humans actually hear noise.

**u-value = the rate of heat transfer... So a higher number means more heat is lost through the skylight.

Mardome roof light

Now that we've decided on glass...

As the glass is on a vehicle it must be either toughened or laminated for safety (and really should be e-marked... but hey ho...) The unit we have specced (this will be custom made) consists of an outer layer of 4mm toughened Planithern 4S glass, a 20mm argon spacer, and an inner 6.4mm laminated glass. The Planitherm offers "excellent solar control properties, reduced glare and enhanced thermal insulation". So it reflects the sun and keeps the van cooler in hot weather. 

We will fabricate a steel frame welded into the structure of the van to accommodate the window unit. The frame will be trimmed on the inside to prevent cold bridging from the outside which would otherwise cause condensation. Inside the van there will be a channel built into the frame to accommodate a custom made blackout window blind.


How big can we make this skylight? HUGE. We’ve ordered a 118x112cm double glazed unit from www.sealedunitsonline.co.uk. It might take up to 28 days to arrive though. 


Above the kitchen area there be a Fiamma 28F turbo fan roof vent, which will ensure the van is well-ventilated and let in even more natural light.

Fiamma 28F Roof Vent


Thursday, 21 May 2020

Flooring

Today we tackled the floor of the van. We've decided the floor will be laminate, as it is robust, sturdy, light and easy to clean.

The van already came with a floor in situ made of OSB board and we did think about replacing it with thicker wood but it does just fine, and especially since we've opted to floor with laminate which will give it extra rigidity. So we removed the original floor, filled in any random screw holes, and put down 4mm PET bubble insulation for additional coziness, fixed down with spray adhesive. We then used 18x34mm planed timber batons to support the floor, laid on top of the bubble insulation. The original floor was replaced and screwed down to the batons.


In terms of laminate, we've chosen Quick Step Aquanto laminate flooring in an oak colour. This laminate claims to be waterproof when installed using some super expensive Hydrokit silicone and has an abrasion rating of AC4 which means it's suitable for commercial/high traffic areas, so should be durable enough for the van even when in 'van mode' transporting tools and equipment.

We've used standard foam underlay, and have fixed this to the chassis of the van with foil tape to increase it's waterproof-ness should any water get under the laminate.


We also debated whether to lay the laminate lengthways or widthways. Lengthways would give a greater stability so we opted for this, with the joins in a random fashion pretty much just as you'd lay laminate in a house. The joins were sealed with this Hydrokit stuff, and it was also used around the periphery of the entire floor. So should be safe for mopping/wet feet/soggy doggies/spilling wine.


To give a professional sleek finish, the edges at the back and the side door of the van were finished with an aluminium trim which was screwed down.


Monday, 18 May 2020

Water tanks

We've opted for custom made underslung water tanks from Barratt tanks. We will have a 100L fresh water tank and a 45L waste tank. These are more expensive than just standard in-van tanks, but they save so much space inside. A whole other cupboard for snacks.

We plan to still have a small tank inside the van for drinking water, as when we're travelling we can't always guarantee the quality of water we will fill up with.

Heating and water decisions

Another decision is what kind of heating and water heating options to use. The previous van conversion used a Carver air heater and a Carver Cascade 2 water heater.

We considered using a combination air/water heater such as the Truma Combi 4E as it's so slick and modern looking and saves space by being combination. However it is expensive (£1500 installed), uses quite a bit of electricity, and may or may not be noisy (it's impossible to find a video of this thing running!)

We have sort of decided on the Carver 1800 Caravelle 4 heater and the Malaga 5 water heater. The Carver heater is silent in operation, and uses no electricity. We plan on retro-fitting a new more modern controller unit to replace the awful 80's beige plastic one.


Saturday, 16 May 2020

Sound deadening

Today we've focused on sound deadening. We've started by bonding the panels of the van to the chassis with Sikaflex, as some of these had come apart and were rattling.


For actual sound deadening we've used Dodo mat hex sheets. This is A4 sheets of what looks like shiny silver bubble wrap that sticks onto the panels of the van and deadens the sound. Magic.


We also started to install horizontal wood batons (38 x 25mm treated timber) for the ply lining to be screwed to.


We have also put flashing tape over the wheel arches to further deaden the road noise